
You are in cruise on an IFR flight plan, approaching your destination and getting ready for an instrument approach. There are many things to do, steps to take, buttons to push, instruments to scan. It is a busy time and you must stay ahead of the game to have a chance to get down. As is often the case, mnemonics have been invented to help recall what to do. My problem with mnemonics is that while I usually am able to remember them, I tend to forget what they stand for. Furthermore, in Technically Advanced Aircrafts some are obsolete. Consider for example the common 5T: “turn, time, twist, throttle, talk”. Well, we don’t turn, autopilot does. How often do you need timer these days on an instrument approach? We don’t twist anything anymore, the navigator does it. Throttle and talk remain though.
This post is intended to walk you through a sample (and simple) ILS approach flown in a Cirrus Perspective airplane. While Cessna G1000 has buttons in different places, the systems are close enough for this description to be also applicable to a G1000 equipped airplane. Hopefully, after reading it, you will be able to come up with your own mnemonics and maybe, just maybe you will be able to remember what they stand for.
We will assume a fully coupled approach, no equipment malfunction and ATC vectors with published missed procedure.
Flight
This is a typical IFR training flight from San Carlos (KSQL) to Stockton (KSCK): KSQL SJC V334 SUNOL MOD KSCK. All these zig-zags look weird, but we will not fly them, we will be getting vectors from the ATC, which will keep us on a more sane trajectory.
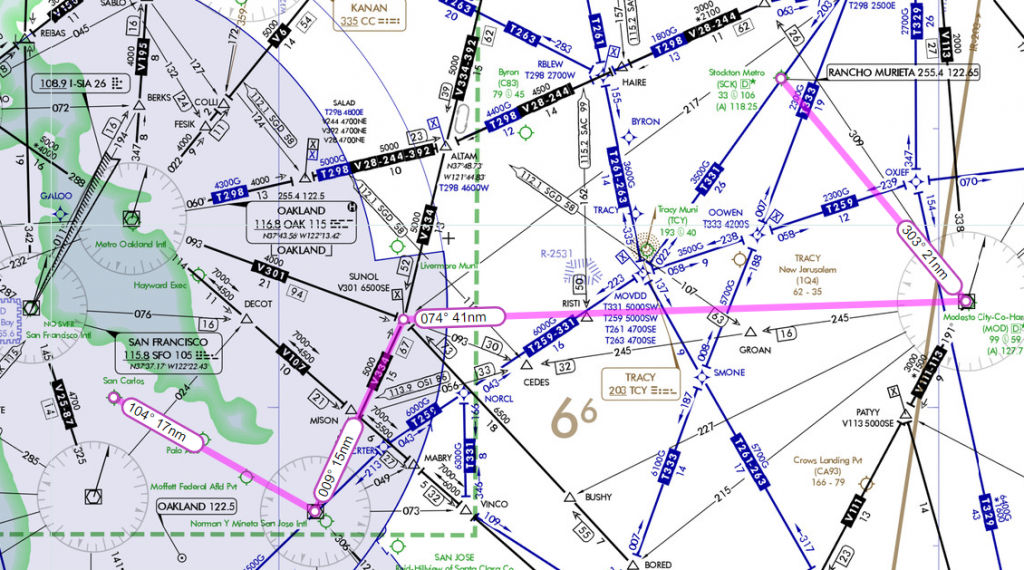
Let’s skip departure and climb and imagine you are somewhere west of Sunol and south of Tracy at 5000 feet and 060 vector. You expect that ATC will turn you to join final approach course for the ILS 29R at Stockton.
Preparation
Cruising along still about 15 minutes from the destination, there isn’t much to do, until you remember what your instructor was saying. If you have nothing to do, ask yourself what you could do to stay ahead of the airplane.
Radios
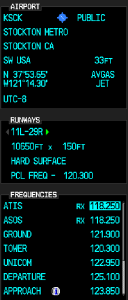 At that altitude, you can already get Stockton ATIS, so let’s pick it up. I hope you are not entering it manually from an approach plate, there is a better way. You simply highlight KSCK on the flight plan and press ENT to display information about the airport, scroll down to frequencies and you can now enter ATIS into active and Tower into standby on COM#2.
Relevant parts of the ATIS are:
wind 290/10 …. altimeter 29.99 …. using runways 29L and 29R.
Note the time after you listened to the ATIS so that you know how old it is. If it is close to normal ATIS change time (15 to 5 minutes before hour), you may have to listen again.
This confirms the runway and ILS 29R is the obvious choice of the approach. Before leaving the radios, you flip the frequencies so that tower is preset on the COM#2 active. Some people like to set up ground into COM#2 standby, there is nothing wrong with that if there is still plenty of time, but I like to think that I can also take care of that while on the ground after exiting the runway, there is definitely no rush at that time.
Briefing
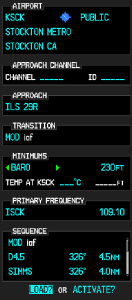 Time to load the approach, so press PROC button to bring the menu and select ILS 29R from the list of approaches. The system will ask you for a transition, you should select the one that has waypoints most likely to be needed for your route, in this case we will choose MOD as the initial approach fix. Below transition, you will be asked to choose minimums, select BARO and enter 230 feet in the altitude field. The selected altitude will show next to the altitude tape on the PFD when you are on the final approach segment. Finally, you will load (not activate, see notes at the end) the approach so that it appears in the flight plan. Pressing ENT is the most convenient way to move down between fields.
Some people use Vectors as transition, please don’t do that. You can always Activate-Vectors-To-Final later on, if you are being vectored, but selecting Vectors as transition will cause the system to drop guidance to all waypoints before the final approach fix. Whether to use Activate-Vectors-To-Final or not is a topic for some other day.
After loading the approach, it will appear in the flight plan.
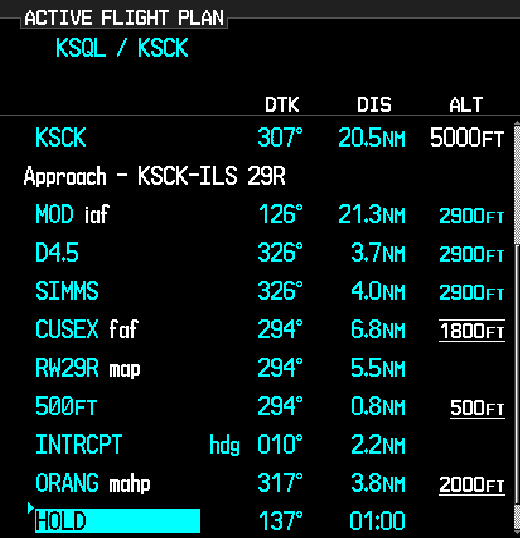
Time to review and brief the approach, which you do aloud, reading from the approach plate: This is an ILS 29R to Stockton (confirm), final approach fix is CUSEX (confirm), altitude 1800 feet (confirm, set), final approach course 294 (confirm), localizer frequency 109.4 (confirm), decision altitude 232 (confirm), missed approach climb to 500 feet on runway heading (confirm), right turn to 010 (confirm), intercept 309 radial from MOD (confirm), climb to 3000 (confirm) and hold at ORANG.
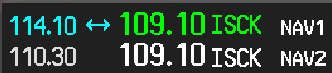
The (confirm) notes mean that you look at the MFD and confirm that the value on the approach plate matches what you see on the MFD, in the flight plan or in the nav frequency window (when you load the approach, localizer frequency is loaded into NAV#1 and NAV#2 active). This serves double purpose: first that you loaded the right approach and entered the right data and second to help memorizing the approach.
Note: You score bonus points if you noticed something wrong on that approach.
Vectors
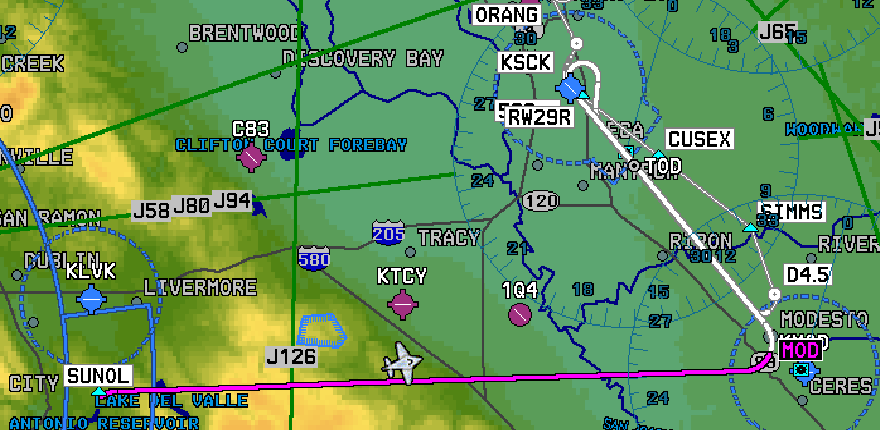
ATC will be vectoring you for the approach and at some point, you will get the clearance. Let’s assume that after a series of vectors you are now on heading 360, 6 miles from CUSEX at 2000. It is reasonable to expect that you will be told to join the final approach course between SIMMS and CUSEX, so you activate the leg from SIMMS to CUSEX on the flight plan (bonus points: there are three ways to do it). ![]()
The approach is now activated and the leg from SIMMS to CUSEX is the active leg.
Couple minutes later you hear what you expected: Cirrus 1234 is 5 miles from CUSEX, turn left heading 330, maintain 2000 until established, cleared for ILS 29R Stockton.
ATC clearance is your memory trigger for four actions:
- Verify that the approach is activated, which it already should be at this point. You do that by glancing at the active leg on the flight plan. In rare cases it isn’t, you’ll activate it by selecting correct approach segment and activating it. This will ensure that the lateral navigation is operational
- Press APR autopilot button, which will arm the localizer and glideslope intercept. You confirm that GS is displayed in the autopilot status box in white, to the right of ALTS and that white GPS changed to LOC, since this is an ILS approach.

- If you haven’t done it yet (and you should have already), you slow down to the approach speed, it would be 120 knots in a Cirrus SR22.
Pressing ARM arms both localizer and glideslope intercepts. If the ATC instruction is intercept final approach course, you should press NAV instead, which will enable only localizer intercept, since you didn’t yet receive clearance to descend on the glideslope.
Approach
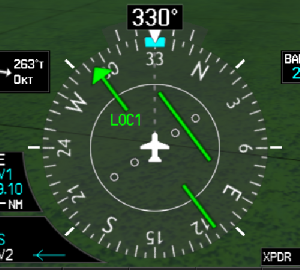 As you are getting close to the final approach course on the heading 330 and 2,000 the HSI needles turn from magenta to green, this is the indication that the system switched from GPS to localizer (VLOC) as the course source. You glance at the localizer frequency window to confirm that ISCK is displayed both on NAV#1 and NAV#2, which means that the localizer was identified and make a call out: Localizer alive and identified.
At this point, you may ask if I didn’t forget something. Shouldn’t we descend to 1,800 (FAF altitude), since we are established? We could, but why should we? This will involve three configuration changes (initiate descent, level off, start descent on glideslope) versus only one if you stay at 2,000 and intercept glideslope at that altitude.
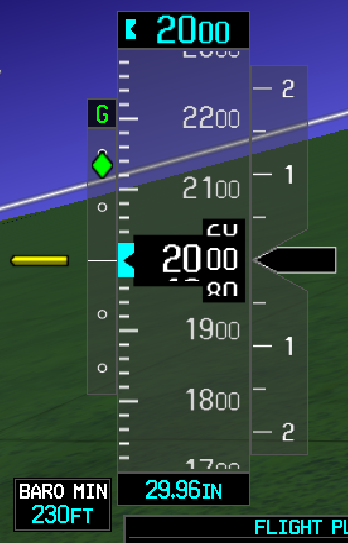 Intercepting the final approach course, the airplane turns to 294 and about two miles before CUSEX, glideslope indicator shows next to the altitude tape (green diamond). This is your memory trigger to make a callout: glideslope alive and put 50% of flaps. Without any power changes, it should slow you down to 100 knots. As the airplane intercepts the glideslope, the GS in the autopilot status box starts blinking and becomes green, the airplane starts descending and you reduce the power to maintain 100 knots.
When you are at CUSEX, as shown in your navigation box, you verify altitude, it should be 1,800 and make a callout: FAF altitude checks. From that point, there is only one thing to do, you need put 2,000 in your altitude selector for the missed approach altitude. I’ve seen pilots putting DA in the altitude selector and it is a really bad idea, more about it at the end of the post.
Missed Approach
The airplane announces: minimums when you reached the minimum you programmed. If the runway environment is not in sight (and it rarely is during training flights), time to start the missed approach.
You press TOGA button on the throttle, causing the autopilot to enter GA mode (Go Around), which consists of wings level and pitch 7.5 degree up attitude. You apply full power and right rudder as the airplane starts to climb. The airspeed will most likely be above the minimum airspeed for flap retraction, so you can retract them right away.
When you are established in climb, you press NAV to re-enable lateral navigation and IAS, while turning the autopilot knob up to increase your airspeed and enable vertical navigation. As a general rule, you climb on IAS and descend on VS.
If you are flying a Cessna with G1000 and GFC700 autopilot, pressing GA button will also disconnect autopilot, so you have to be ready to hand fly the first part of the missed and press AP to re-enable the autopilot, after you you pressed NAV and IAS.
The airplane will execute the missed approach procedure and the only remaining thing to do is to reduce the power at the top of the climb.
Summary
While there will be differences for different approaches, the general sequence will be as follows.
- In cruise
- enter ATIS and Tower into COM#2
- listen to ATIS and flip COM#2
- load approach
- choose appropriate transition (not vectors)
- set up baro minimums
- brief approach
- confirm approach name and airport
- confirm all waypoints
- verify final approach course and FAF altitude
- confirm localizer frequency
- review missed approach procedure
- When cleared for intercept (may be cleared for approach directly)
- confirm appropriate leg in the flight plan is activated
- press NAV to arm localizer intercept
- When cleared for approach (include step 2 if not done yet)
- verify leg is activated and course is correct
- press APR to arm glideslope
- when localizer is active, call out: localizer alive and identified
- confirm HSI announces localizer
- When glideslope is alive (diamond visible)
- call out: glideslope alive
- put 50% flaps (10 deg in a Cessna)
- After glideslope intercept
- reduce power to maintain 100 knots
- enter missed approach altitude into altitude selector
- make altitude callouts at 1000, 500, 200, 100 and at DA
- At Decision Altitude (MAP)
- press TOGA (or GA on a Cessna)
- apply full power, pitch up following flight director and raise flaps
- press NAV to re-enable lateral navigation
- press IAS (FLC on a Cessna) and set up Vy airspeed in climb
- in a Cessna: press AP to re-enable autopilot
- Voila: the airplane will now fly the missed. All you have to do is to keep right rudder in climb. Unless of course you have G5 with yaw damper.
Here you go. You can now figure out your own mnemonics to remember all that.
Bonus points
What were these bonus points about? The course from to hold at ORANG was shown as 317 on the flight plan. This is because the simulator has old plates, where that was ECA radial 317. Manteca is now gone and ORANG is on 309 radial from Modesto. You were supposed to notice that when briefing the approach.
Why is it a bad idea to enter DA into altitude selector? Most of the time, airplane will dip slightly below DA at MAP. After you press TOGA, it will pitch up to 7.5 degree and promptly level off at DA, because that’s what you selected in the altitude selector. You are now flying level at 200 AGL in the soup.
Why you should load, not activate an approach? Activating an approach is equivalent to going direct to the first waypoint, which will change what times and distances you see on the PFD and MFD and if you are in the autopilot NAV mode, will send you to that waypoint. You usually don’t want neither.
What are three ways to activate a leg on a flight plan:
- Press Act Leg soft key on the MFD
- Press Menu on the MFD and select Activate Leg
- Press Menu on the PFD (with flight plan inset visible) and select Activate Leg