
Pattern, what pattern?
You are flying along, or perhaps it would be more accurate to say that the autopilot is flying the airplane. Normally, you always file IFR and fly an instrument approach, as it’s so much easier and safer.
Your home airfield has a 6,000-foot runway and your personal minima prohibits landings at runways shorter than 4,000 feet, so more often than not you fly an approach procedure with vertical guidance. You file and fly IFR even in severe clear and the approach brings you to 200 feet above the threshold. That’s where things get dicey, because you have to disconnect the autopilot, flare and touchdown. You know that Cirrus introduced auto-land capabilities in the Vision Jet, although for now that is only for the jet and in emergencies. But there is hope.
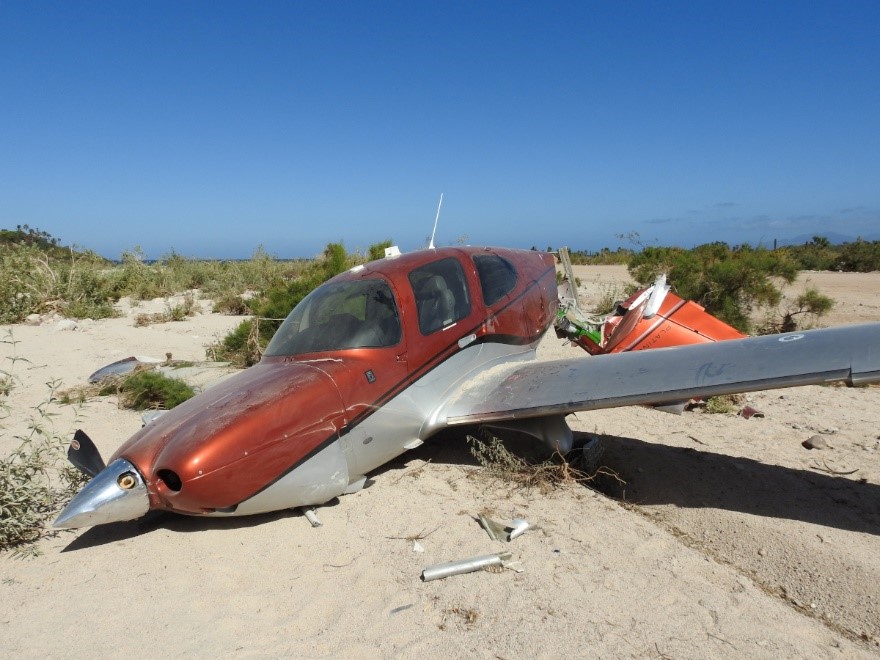
That description is of course an intentional exaggeration, prompted by yet another traffic pattern accident. The pilot became distracted, slowed down, overshot the final, tightened the turn with the rudder, pulled up for good measure and stalled. There are innumerable variants of the same sad story and each generates vivid and long discussions on internet forums – how to avoid such things in the future, why a competent pilot killed himself and possibly passengers, how to change the procedures to avoid that happening again and what additional automation we should have in the airplane that could save the day. There are those who know better and want to educate others, those who are scared that something like that could happen to them, those who say more training is required and those who say we’ve been saying that since Wilbur Wright and it didn’t change anything. We must try something else.
Procedures
This article was prompted by yet another accident and I will further discuss some of these ideas. Starting with procedures … to its immense credit Cirrus Aircraft published a recommended set of procedures on flying the traffic pattern. If you do not have a copy of iFOM (Flight Operation Manual), buy it immediately on iBooks. There are two versions, one for Avidyne-equipped airplanes and one for Perspective avionics, although for the purpose of traffic pattern, it does not matter. Still, you want to buy the right one.
This is what they have to say about traffic pattern.
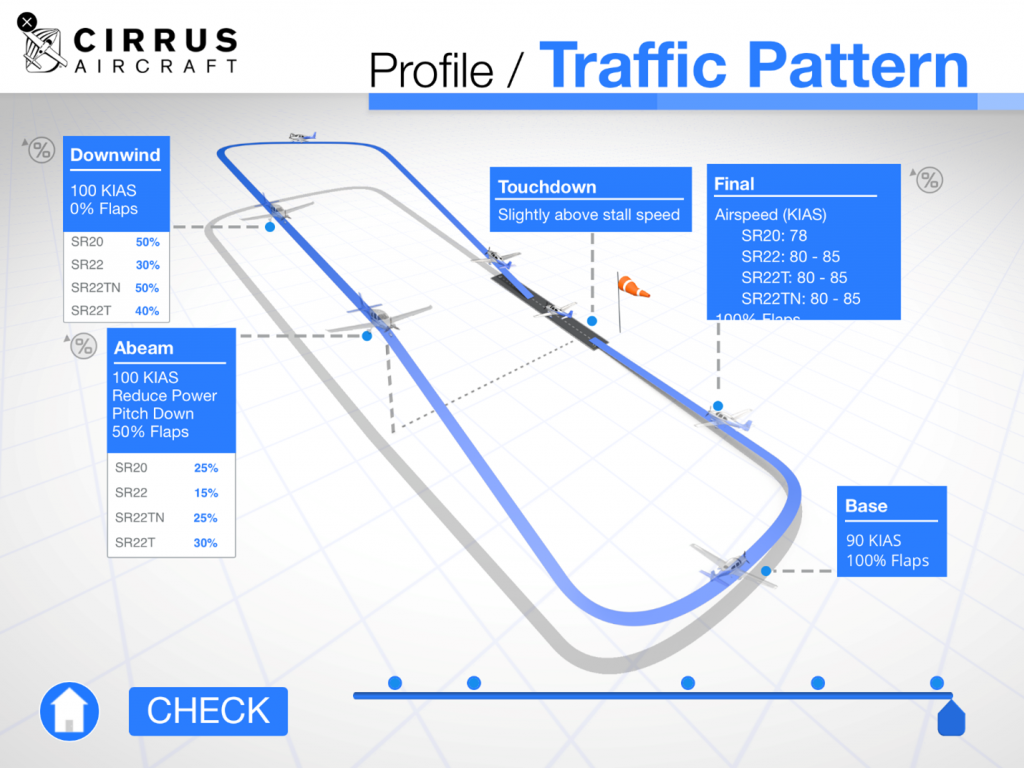
Let’s assume you are flying a SR20, it is pretty simple.
- On downwind: 50% power, 0% flaps, 100 knots
- Abeam the numbers: 25% power, 50% flaps, 100 knots
- On base: 25% power, 100% flaps, 90 knots
- On final: 78 knots, 100% flaps
This is not a result of somebody’s imagination, who on a spur of moment decided that this should be just fine. This is a result of collective discussions and wisdom of the best instructors in the industry. People who designed these airplanes and flew them before anybody else. This is wholeheartedly embraced by the corps of CSIPs (Cirrus Standardized Instructor Pilot), all of whom have done thousands and thousands of patterns, often more in a month than an average pilot does in a lifetime.
But of course people still kill themselves, so shouldn’t we talk about changing it and inventing better procedures? If 90 knots is not good enough, shouldn’t we fly the base at 100 knots? Maybe 110 knots? If rectangular pattern doesn’t work, shouldn’t we fly an oval pattern?
But ask yourself this question: Do people kill themselves because they fly these procedures or because they do something else? What makes you think that they will now fly your procedure precisely as you prescribed it? A procedure that you proposed based on your infinitely smaller experience in a Cirrus.
Technology
If the better procedures are not the answer, perhaps its better technology. I’ll skip more outlandish ideas such as automatic CAPS deployment and talk about AOA indicators. Not because I am against AOA indicators, they are fine complements to all other instruments, but because so many people claim this is the ultimate solution. You are now flying on base or final, and too slow, the AOA indicator chimes in or you notice the wrong doughnut, so you push the nose down and nicely recover … another fatal accident avoided. Except that it doesn’t work like that. We already have a binary AOA alert, the stall warning, and that didn’t prevent people from stalling. If the pilot doesn’t hear the stall warning, what makes you think that he will hear or see the warning from the AOA indicator?
The reality is that in actual fatal accidents, the stall happens fast, the wing drops, the airplane gets inverted and the pilot didn’t even register that the stall warning went off, not from the audio alert and not from visual indications. These are not the stalls that you practiced for the private pilot license. “OK, let’s slow down, pitch down in landing configuration, now bring the nose above the horizon, wait, wait, wait, feel the buffet? Let’s recover, we don’t want to spin the airplane, do we?” It just doesn’t happen like that.
If better procedures and new gizmos are not the answer, what is? More training, I hear some say. The typical response is “We’ve been saying that since Wilbur and it doesn’t fix the problem.”
Not more, but better training
It’s not more training, it is better training … different training. It is not practicing more stalls, it is how they are practiced. It is not more landings, it is different landings. It is pushing you out of your comfort zone, so that in real life, if you accidently get close to the edges of that comfort zone, you will know what to do, because you already experienced more than that.
I’ve heard people say, “I will not train to do forward slips – and most certainly not slipping turns – because it is too dangerous. It is easy to enter a spin from a cross-controlled stall, and besides, I would never perform a forward slip in my flying, I would just go around if I found myself too high.”
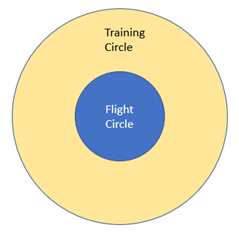
Here’s a thought: You are flying and training in a small area of the airplane envelope. If you ever inadvertently approach the boundary of that circle or cross it, you’ll find yourself in uncharted territory. If you are there for the first time, it is unlikely that you will be able to figure out what to do. If you are training in a much larger training circle, exploring the edges of the envelope with a qualified instructor onboard, then even if you happen to cross your boundary, you will know what to do, because you’ve already been there. It actually gets even better. Not only will you know what to do if you are outside, but you will notice that you are at the edge of your flying circle and take a corrective action preventing the airplane from ever getting outside.
Training maneuvers
Let’s elaborate on that idea and give you few examples of what you and your instructor could be doing for practice. I’d like to underscore the point that you have to do it with an instructor, not only for safety reasons, but because you want constructive feedback when you make mistakes.
There is no specific order of importance here.
Stable pattern
Many people think that the adjective stable applies only to the final leg. It applies to the whole pattern. Give yourself this challenge, assuming there is no other traffic. From downwind, you are allowed to make only three power changes. The first one abeam the numbers, to start descending, the second one on final, to adjust the glidepath and the third one to cut the power off in the flare. You should maintain the prescribed airspeeds (100/90/78) all the time. Bonus points if you can do it with only two power changes.
Look outside and look in front of you
When on downwind, you should keep glancing toward the runway to know when to start descending and when to start turning base. Glancing, not staring. I see so many pilots staring at the runway, which is 45 degrees behind, while initiating the downwind to base turn and base to final turn. In the meantime, the airplane pitches up, the pilot doesn’t see it, because, you guessed it, he is looking at the runway instead of the nose of the airplane and is slowing down. Give yourself this challenge. Notice where the wing points before starting the turn to base and execute a 90-degree turn looking only in front of you. Wait for that point to come in front of you and level the wings. You’ll be surprised to find yourself perpendicular to the runway. Do exactly the same before turning final – don’t crane your neck to spot the runway, wait for runway to show in front of you.
The second half of the challenge is even more important: Aircraft pitch must not change from the time you started descending until you rolled out on final.
Bonus points if you can start your base turn without looking at the runway, i.e., you only look after rolling out on base leg. Avoid doing that training maneuver at airports with parallel runways.
Once you are good at it, start varying the altitude of downwind leg.
Forward slips
Come in very high, really high, cut the power, lower the nose, kick in full right or left rudder and forward slip the airplane to landing. With a fat composite prop on turbo models, this can be done from ridiculously high altitudes.
Bonus points is if you can perform the forward slip while turning, all the way from downwind, through base and final. Mastery of that maneuver will be helpful with the next one.
Power off approaches
If the engine quits on downwind, you should pull the chute. I know I would. But this is an energy management exercise, which you are not going to use in your normal flying. Pull the power off abeam the numbers and land. Be sure and coordinate with the tower if there is one or notify traffic of your intention. Depending on the propeller you have, you have to turn immediately to the runway or you’d be able to extend a little bit on the downwind. My personal technique is to leave flaps up and fly at 100 knots until the runway is made, at which point I go with full flaps.
If you are good at it, fly over the runway at a higher altitude and perform power-off landing from 3,000 or 4,000 feet. Be sure and announce your intention.
Bonus points if you can touch down 200 feet from the designated spot. You are now ready for the commercial checkride.
High speed approaches
The standard approach calls for 78 knots on final, but we are in training. Have your instructor bring in the airplane at the maximum airspeed with full flaps, 104 or 110 knots depending on the model, over the numbers into ground effect and give you the airplane for landing. Obviously, you will need a little bit longer runway and lots of patience to fly the airplane in the ground effect, slowing down while maintaining constant height above the runway until it finally runs out of energy and touches down. Do not let the airplane touch down prematurely and initiate immediate go-around if it does. Here is what happens to people who force airplanes onto the runway.
Bonus points if you can do the same when the instructor brings in the airplane at half flaps and maximum speed (119 or 150 knots) – you will first wait until 104/110, use full flaps without ballooning and land. You may need more than 10,000 feet of runway if you start at 180 knots and no flaps.
Accelerated stalls
This is a standard maneuver for a commercial certificate, but you can practice it anytime. It involves entering a steep 45-degree turn, reducing the power and pitching up to induce the stall. You must remain coordinated through the maneuver, otherwise unpleasant things may happen. It is preferable to give yourself extra altitude for this maneuver. I like to be at least 5,000 feet AGL.
Spins
You can’t do this one in a Cirrus, but that shouldn’t prevent you from flying it. Find an instructor who is proficient and has done thousands of spins – I did mine for the first time with Rich Stowell, who unfortunately decided to do other things after 30 years of aerobatic, spin and unusual attitudes training. Most importantly, enter spins from accelerated stalls.
Sign up for upset recovery programs, there are many options available, you will a have fantastic time in airplanes such as an Extra, which rolls faster than you can think about it.
Engine failure after takeoff
You need a sufficiently long runway for that, preferably 10,000 feet or more and an accommodating tower controller. After a normal takeoff, the instructor will pull the power at 300-400 feet, you will need to pitch down immediately, put full flaps and land. This sounds easy when described, but I’ve had a few pilots so startled by the sudden loss of power, in spite of the fact that they knew it would happen that they were slow in pitching down. You will be initially surprised how aggressively you need to pitch down.
Parting thoughts
These are just few ideas of what you might practice and I am sure your instructor will have other and possibly better training maneuvers. Make sure that the instructor you choose has enough practice in whatever you train in and is not doing it for the first time with you onboard. Always do these with an instructor, not only for safety of flight, but also so that he or she can point out all mistakes you make.
Going beyond a Cirrus will also allow you expand your envelope, even if you don’t plan to fly other aircraft. A commercial certificate will give you confidence and mastery of aircraft that you didn’t think was possible and now that the Federal Aviation Administration (FAA) changed regulations and allows certification in Technically Advanced Aircraft (TAA), you can obtain it in your Cirrus. Wheel landings in tailwheel airplanes will teach you proper height above the runway in the flare. Gliders will teach you energy management, power-off landings and intuitive rudder control. I am sure aerobatics are immensely valuable, but I don’t have any experience with that, so I’ll not talk about it.
After I wrote this article, I found out that I was not the first with these ideas. David St George published an excellent blog about envelope extension maneuvers: https://safeblog.org/2019/08/17/extend-your-skills-60-90-turns-triple-a-stalls/ where he talks about the same topic. This in turn was based on Expanded Envelope Exercises© program invented by Ed Wischmeyer.